
The most important step in setting up a Nest thermostat happens before you open the app: confirming that the exact thermostat model is compatible with your HVAC system. If you’re planning a Nest thermostat setup San Antonio homeowners can feel confident about, checking compatibility first can help you avoid wiring confusion and keep comfort on track through hot weather.
Take care before changing thermostat wiring or settings. This guide covers how to identify your system, prepare for installation, complete app setup, and choose settings that suit your home and local seasons. Setup screens and requirements vary by model, so follow Google’s current instructions for your specific thermostat.
You’ll also learn when a wiring or configuration question calls for HVAC expertise. Comfort Boys Air and Heating provides smart thermostat installation and HVAC service in San Antonio and the Hill Country, helping homeowners address setup questions that involve the thermostat and the equipment it controls.
Key Takeaways
- A reliable Nest thermostat setup San Antonio homeowners can trust starts with checking compatibility between the exact thermostat model and the HVAC system.
- Follow Google’s current model-specific instructions through installation, device prompts, app connection, and a final system test.
- Separate app or Wi-Fi setup problems from wiring or HVAC-operation concerns to identify the right next step.
- Use a weekday and weekend schedule as a starting point, then adjust it to your household’s routine and comfort preferences.
- Comfort Boys can help with smart thermostat installation and HVAC-related setup questions when wiring or system configuration needs attention.
Nest Thermostat Setup in San Antonio: What to Check Before You Begin
Reliable thermostat control starts with knowing what your Nest model and HVAC system require, not guessing at wires or app prompts. A careful Nest thermostat setup San Antonio homeowners can approach with confidence includes checking compatibility, understanding the existing wiring, preparing the device, connecting through the appropriate app, and choosing settings that suit the household.
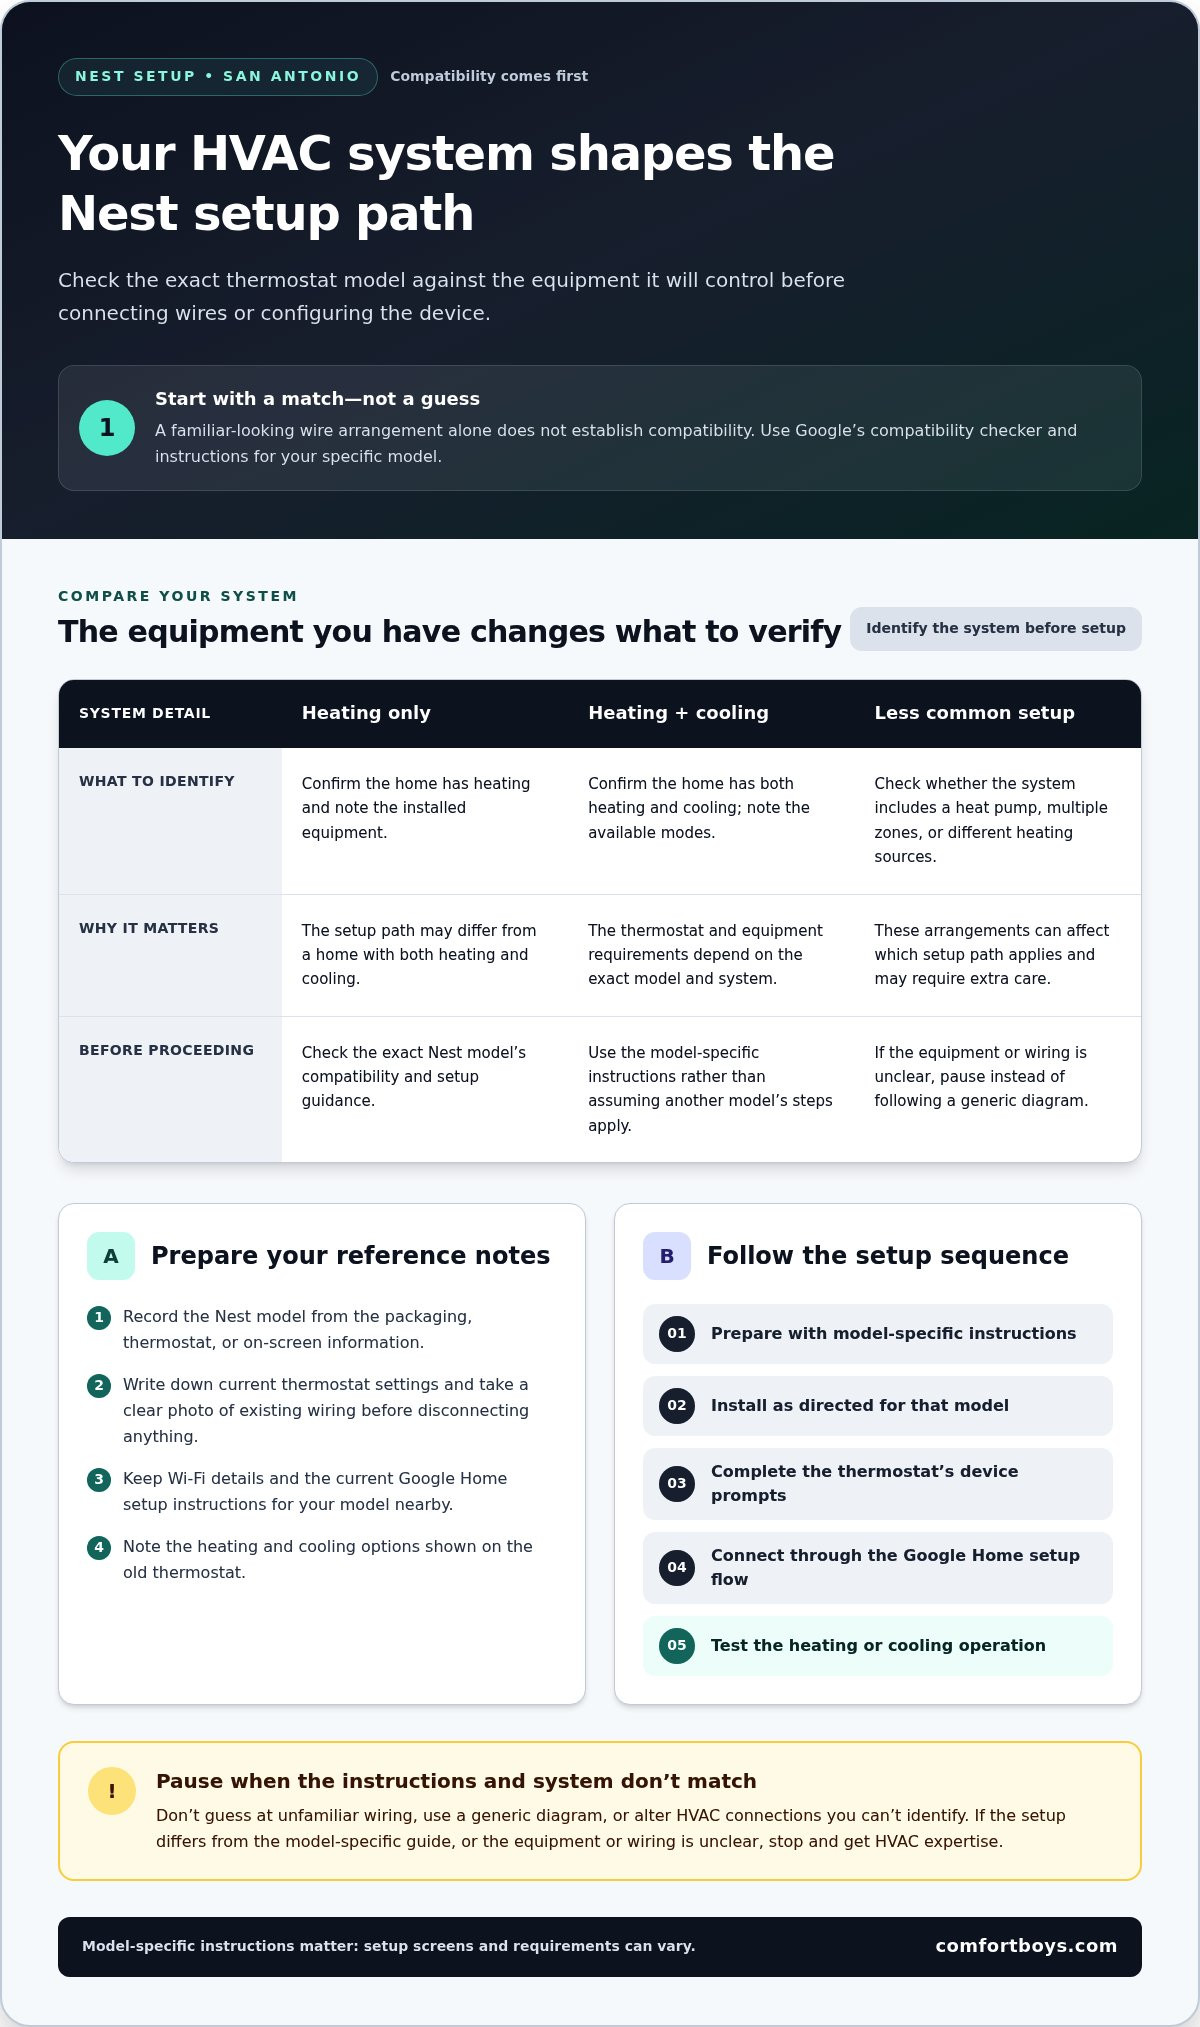
The exact process depends on both the thermostat model and the equipment it will control. A home with heating and cooling may have a different setup path from one with heating only, and less common configurations can require extra care. Identify what’s installed and use the current Google instructions for your specific model before following general directions. The Nest Thermostat Wikipedia overview provides background on the thermostat’s history and features, but use Google’s model-specific guidance for setup.
Key check: Confirm compatibility between the thermostat model and HVAC system before connecting wires or configuring the device.
Identify your Nest model and existing HVAC system
Start by finding the model name or other identifying information on the thermostat packaging, device, or its on-screen information. Then note whether your home has heating, cooling, or both. Don’t assume instructions for another Nest model will apply, because setup screens and requirements can differ.
- Record the Nest model so you can open its matching setup instructions.
- Note the type of heating and cooling equipment you have, using existing system documents or labels if available.
- Flag less common arrangements, such as a heat pump, multiple zones, or a system that combines different heating sources. These details can affect which setup path applies.
Compatibility depends on the particular thermostat and HVAC equipment, so a familiar-looking wire arrangement isn’t enough to establish a match. Use Google’s compatibility checker and model-specific guidance before proceeding. If the equipment type or wiring is unclear, pause rather than trying a generic diagram.
Prepare the home and setup information
A little preparation makes the installation and app steps easier to follow. Keep the instructions for your exact Nest model nearby and have your home’s Wi-Fi details ready. You’ll also need access to the relevant Google Home setup flow, following the instructions provided for that device.
- Write down the current thermostat settings and take a clear photo of the existing wiring before disconnecting anything.
- Keep your Wi-Fi network information available so you don’t have to search for it midway through setup.
- Note any heating or cooling options shown on the old thermostat, especially if your system has more than one mode.
These notes give you a useful reference if you need to compare settings or troubleshoot later. Once the model, equipment, and instructions line up, you’ll be better prepared to install the thermostat without rushing through an uncertain wiring or configuration step.
How to Set Up a Nest Thermostat: A Step-by-Step Walkthrough
After identifying the thermostat model and reviewing compatibility, follow its current Google setup instructions from start to finish. Complete the physical installation as directed before moving through the device prompts and app configuration. Screens and requirements vary by model, so don’t rely on steps written for a different Nest thermostat.
Setup sequence: Prepare the device, install it according to its model-specific guide, complete the on-device prompts, connect it through the Google Home app, then test the heating or cooling operation.
- Prepare the setup. Keep the model-specific instructions, Wi-Fi details, and notes or photos of your existing thermostat settings nearby. Review the guide before handling the wiring so you understand the steps for your device and system. If the instructions don’t match what you see, pause and resolve the discrepancy before continuing.
- Install the thermostat as directed. Use the wiring diagram and physical installation steps for your exact model. Match each existing connection to the instructions rather than relying on a generic diagram or assumptions about familiar-looking wires. Don’t bypass the wiring guide or alter HVAC connections you can’t identify. If the setup differs from the guide, get HVAC help instead of guessing.
- Complete the device prompts. Once the thermostat is ready for configuration, use its on-device controls to select the language and applicable basic preferences. Read each prompt carefully and choose options that reflect your home’s equipment. The available screens may differ, so follow what appears on your model rather than expecting a particular menu sequence.
- Connect through Google Home. Open the current Google Home setup flow for your thermostat model and follow its instructions. When prompted, select the appropriate home and enter the Wi-Fi details. Keep the thermostat and app setup in step with one another. If the app reports a connection or setup issue, follow its guidance rather than changing HVAC wiring to solve an app problem.
- Test heating or cooling. Use the controls available on your model to request the relevant mode, then check whether the system responds as expected. Test the functions your home uses, such as heating, cooling, or both. If operation doesn’t match the selected mode, stop making changes and revisit the model’s troubleshooting instructions or seek HVAC assistance.
After setup, review the available scheduling and control options. The ENERGY STAR Smart Thermostats resource explains how scheduling and remote control can support energy management. Choose preferences that fit your household rather than assuming one schedule or temperature suits every home.
For Nest thermostat setup San Antonio homeowners can approach methodically, follow the exact model’s instructions and separate app steps from HVAC wiring questions. Comfort Boys provides smart thermostat installation and HVAC support if installation or system configuration is unclear.
Nest Compatibility and Setup Problems: What San Antonio Homeowners Should Know
A thermostat can power on and still be mismatched with the equipment it’s meant to control. Compatibility depends on the exact Nest model and the home’s HVAC system, so a setup that works in one house may not suit another. For a dependable Nest thermostat setup San Antonio homeowners should treat the device instructions and the actual system as a pair, rather than assuming similar-looking wiring means the setup is the same.
It also helps to separate connection problems from HVAC problems. An app that won’t complete setup or a thermostat that can’t connect to Wi-Fi calls for a different troubleshooting path than heating or cooling that doesn’t respond as expected. Identify which part is failing before repeating steps or changing wiring.
When to pause and get help with wiring or HVAC compatibility
Stop before changing unfamiliar wiring or making a connection that isn’t shown in the instructions for your model. Unusual equipment arrangements can require specific setup guidance, and trial-and-error changes may make it harder to identify the original issue. Comfort Boys provides smart thermostat installation and HVAC services, so homeowners can get help with thermostat installation and system-related questions instead of relying on guesswork.
- Homeowner checks: Confirm the thermostat model, follow its current Google instructions, check that the selected system options match the equipment, and review the app’s prompts and Wi-Fi details.
- Situations for HVAC expertise: Wiring doesn’t match the model’s guide, equipment details are unclear, the system has an unusual configuration, or heating and cooling don’t operate as expected after setup.
Comfort Boys’ experienced technicians service all makes and models of HVAC systems. Their support can be useful when you need the thermostat and equipment considered together. When setup involves unfamiliar wiring or system operation, describe what you see and what you’ve already tried so the issue is easier to assess.
What to check when app setup or system response fails
Start with the simplest distinction: is the problem in the app connection, or is the HVAC system failing to respond? For an app issue, make sure you’re following the current instructions for the correct thermostat model. Then review the home selected in the Google Home flow, the Wi-Fi information entered, and any prompt that may need a response before trying setup again.
If app setup completes but heating or cooling doesn’t behave as expected, don’t treat repeated Wi-Fi troubleshooting as a fix for a system-operation issue. Check that the thermostat’s selected equipment and mode align with the home’s setup, then refer to the model’s guidance. If the system still doesn’t respond, or its operation changes after installation, pause and have the wiring and HVAC configuration assessed.
Keep a note of the exact message on the device or in the app. Also note which step failed and whether the system responds to a heating or cooling request. Those details help distinguish a configuration question from an HVAC service need and provide a clearer starting point for troubleshooting.
Set Nest Thermostat Schedules for San Antonio Comfort
A useful thermostat schedule follows the household’s routine, not a one-size-fits-all temperature plan. In San Antonio, cooling needs can remain a priority through hot weather, so build around when people are home and what feels comfortable. Treat the schedule as a starting point, not a promise of savings or a substitute for adjusting settings when your day changes.
Build a schedule around your household routine
Before editing anything, sketch a typical weekday and weekend: when the home is occupied, when it’s usually empty, and when everyone settles in for the evening. Then review the schedule using the controls on your thermostat or the current app interface for your model. The names and locations of schedule options can vary.
Use this planning example to identify time periods, not to copy prescribed temperatures. Set each period according to your household’s comfort preferences and the options available on your device.
| Time period | Weekday planning prompt | Weekend planning prompt |
|---|---|---|
| Morning | When does the household usually get up? | Is the morning routine later or different? |
| Daytime | Is anyone home, or is the home usually empty? | Do activities keep people at home? |
| Evening | When do household members return and settle in? | Does the usual evening routine shift? |
| Overnight | What settings feel comfortable while everyone sleeps? | Keep or adjust the routine based on comfort. |
Make one change at a time, then observe how the home feels during the relevant period. If a change makes rooms uncomfortable, revise that part of the schedule instead of overhauling every setting. A schedule should support your routine, and it’s fine to adjust it for a day at home or a changed plan.
Review cooling and heating settings as seasons change
Before San Antonio’s hot-weather period, review the cooling schedule and consider whether its occupied and away periods still match your routine. Prioritize a comfortable home, especially if household members spend more time indoors during the hottest conditions. Don’t assume a schedule that worked in milder weather will feel right as outdoor conditions change.
Revisit heating preferences when local conditions shift, too. Check the selected mode and schedule rather than carrying old settings forward without review. For help thinking through heat-mode controls, consult the guide on how to set heat on a thermostat. Make adjustments gradually and pay attention to how the household responds.
If scheduling is difficult because the device or HVAC system isn’t responding as expected, get help with smart thermostat setup from Comfort Boys. A properly configured system gives you a clearer starting point for making comfort-focused schedule choices.
When Comfort Boys Can Help With Nest Thermostat Setup in San Antonio
Some setup questions are straightforward to resolve by following the current instructions for your exact Nest model. Others involve wiring, system compatibility, or heating and cooling that doesn’t respond as expected. Knowing which kind of issue you’re facing helps you choose a practical next step and avoid changing settings or connections without a clear reason.
Choose the right next step for your setup situation
If you’re unsure which screen to select or how to complete an app prompt, return to Google’s current instructions for your thermostat model. Check that you’ve selected the right home and entered the correct Wi-Fi details before starting over. For broader smart thermostat considerations, Comfort Boys’ Smart Thermostat Installation San Antonio buying guide can help you explore the topic beyond setup.
- Continue with model instructions for app prompts, preference selections, or a connection step that doesn’t appear as expected.
- Get HVAC help if the wiring doesn’t match the model’s guide, equipment configuration is unfamiliar, or heating or cooling fails to respond as expected.
Don’t guess at unfamiliar wiring or make unsupported connections to push through setup. An HVAC professional can assess how the thermostat configuration relates to the equipment and help address installation or system-operation questions. Comfort Boys provides smart thermostat installation and HVAC services, including AC installation and repair, heater repair, and maintenance.
Get local smart thermostat and HVAC support
Comfort Boys serves San Antonio and the Texas Hill Country, including Boerne and Comfort. Its experienced technicians service all makes and models and can help with smart thermostat installation or related HVAC questions. The company provides same-day response for service calls.
Comfort Boys provides guaranteed satisfaction with upfront, flat-rate pricing that is transparent with no hidden fees. This gives homeowners a clear service path when a setup concern turns out to involve more than app configuration. If you’re unsure whether the issue is a device prompt or an HVAC response problem, note what you’ve tried and what the thermostat or system is doing. Those details can help explain the situation.
For Nest thermostat setup San Antonio homeowners can approach with confidence, follow model-specific app guidance for routine prompts and get HVAC expertise when wiring or system operation is uncertain. Contact Comfort Boys for smart thermostat installation and HVAC support in San Antonio and the Hill Country.
Make Your Next Thermostat Step with Confidence
Your thermostat should support the way you live, not leave you second-guessing settings or system behavior. Once setup is complete, give your household time to settle into the schedule, notice how the home feels, and make small adjustments when your routine or comfort needs change. There’s no need to find a perfect setting all at once.
If you’re planning a Nest thermostat setup San Antonio homeowners can feel comfortable with, use the model’s current guidance for device questions and get HVAC support if wiring or equipment operation remains uncertain. A clear next step can help you avoid trial and error and feel more at ease with the controls in your home.
Comfort Boys can help with smart thermostat installation and HVAC questions. Contact Comfort Boys for smart thermostat and HVAC support in San Antonio and the Hill Country. With the right guidance, you can move forward confidently and make your home’s comfort settings your own.
Frequently Asked Questions
Can I set up a Nest thermostat myself?
Yes, you can set up a Nest thermostat yourself if your equipment is supported and you follow the instructions for your exact model. Before starting, identify the thermostat and HVAC system, then keep the guide nearby as you work. For a Nest thermostat setup San Antonio homeowners can manage with confidence, don’t copy wiring steps from a different model. If a wire is unfamiliar or the system behaves unexpectedly, pause and get HVAC guidance.
Does a Nest thermostat work with every HVAC system?
No, compatibility isn’t universal. It depends on the specific Nest thermostat and the home’s heating and cooling equipment. Use Google’s compatibility guidance for your exact model and answer its questions using information about the installed system. A wiring diagram for another device isn’t proof that yours will work. If you can’t identify the equipment or its configuration, HVAC support can help interpret the setup requirements before installation proceeds.
What should I do if the Nest thermostat will not connect to Wi-Fi?
First, confirm that you’re using the setup flow for your exact thermostat model and entering the correct Wi-Fi network details. Check the thermostat and app for any prompt that needs attention, then follow current Google support guidance before retrying. Don’t change HVAC wiring to address an app connection problem. If the thermostat connects to Wi-Fi but the equipment doesn’t respond to heating or cooling requests, troubleshoot that separately as a possible installation or HVAC issue.
Can I use a Nest thermostat with a heat pump in San Antonio?
Possibly, but compatibility depends on the exact Nest model and the heat-pump configuration in your home. Check Google’s official compatibility guidance for that model and follow its instructions rather than relying on a generic wiring example. After configuration, check the heating and cooling modes available for your equipment and observe whether the system responds as expected. If the setup options are unclear or operation seems wrong, pause and get HVAC help.
Will a Nest thermostat keep its settings after a power outage?
It can depend on the thermostat model, its power source, and what happened during the outage, so don’t assume every Nest behaves the same way. Once power returns, check whether the display is on and review the app connection, schedule, and selected mode. If a setting looks different, consult the instructions for your model before changing it. If heating or cooling doesn’t resume as expected, consider an HVAC issue rather than repeatedly editing the schedule.
How do I add a Nest thermostat to an existing Google Home setup?
Use the current Google Home app instructions for your exact thermostat model and select the home where you want it to appear. Before starting, make sure you can access the relevant Google account and Wi-Fi details. App screens may change, so follow the prompts shown now rather than older screenshots. After the thermostat is added, open its controls in the app and check that you can view the device and its schedule.